I was talking about setting up RAID1 and deploying Nextcloud on Fedora server, in my previous post. This time around I wanted to make it eat less power, since I’m gonna be running it 24/7. I used to shut it down when I knew I wasn’t going to need it for longer time, especially in summer. So, here is what I did to make my home server eat less power, and generate less heat as well.
BIOS
The first thing that I did was some BIOS tweaking. This PC used to by highly overclocked gaming desktop back in its days, it’s power-hungry i7-2700K with 16GBs memory, an SSD and a bunch of HDDs. We’ve got 650W modular power supply unit from Corsair and water cooling combined with Noctua fans, which is an overkill for the current usage, but I’m not buying anything into it. It is what it is. The cooling is at least really silent.
I did already lower the clock when I decommissioned the machine from primary desktop, but to my surprise, I found 4200MHz being the value even now. It used to be around 4.7 GHz if I remember correctly. So I just casually browsed BIOS and changed the following values:
- Disabled
TurboBoostcompletely. - Enabled
EPUThis refers to Asus EPU - so only if we have an Asus mainboard… - Disabled
Internal PLL Overvoltage CPU Voltage- I’ve set this back to Auto. I don’t actually want to undervoltage it, I still need some performance.CPU C1E,CPU C3 Report,CPU C6 Report&Package C State Support- These refer to CPU state reporting back to the OS which is fully supported by most OSes. This will significantly reduce power consumption, but introduce certain degree of lag when introducing some load. Higher C state, higher lag and power saving. Ref 1- Disabled
HD Audio Controller- Disable any other devices that we do not need…
I’m sorry but I know nothing about AMD tech…
System settings
We will run everything below as root, or sudo.
Now we need to figure out what else is waking our CPU up. This could be even stuff like connected HID devices such as mouse, so we need to pull these out if there are any, we have ssh for that! And you should totally unplug any optical devices if you’re using any, not only they eat power directly, but cause your CPU to wake up.
C-states
So the first thing to check is our allowed C state, and raise it if they’re disabled. Ref 2
cat /sys/module/intel_idle/parameters/max_cstate - This reports 9 in this case, which means that our bios settings will be accepted. I didn’t even know they go that high.
PowerTOP
dnf install powertop - There are many power management utilities, we can use a simple PowerTOP.
powertop --calibrate - Install and calibrate powertop. This will take some time to run various tests to see how much power is your machine eating, which processes wake your processor up, etc…
When it’s done, we will be presented with a table showing you how many times does your CPu wake up per second. See Figure 1.
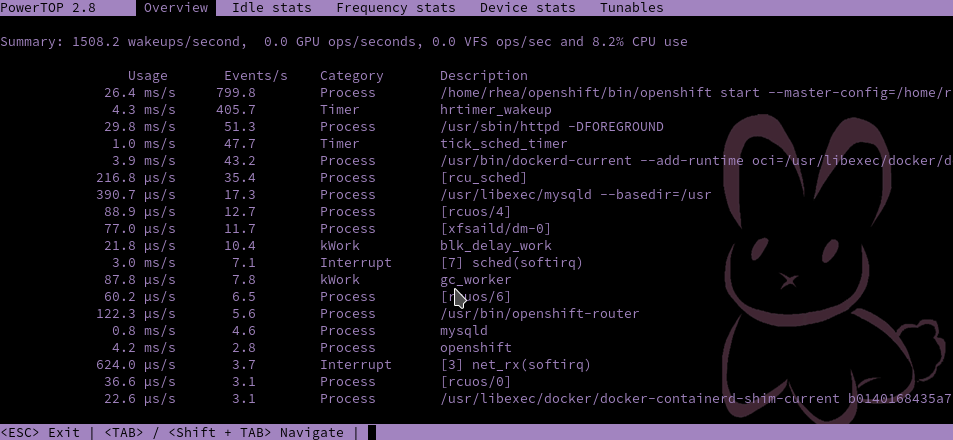
Figure 1: PowerTOP - CPU wakeups
Here we are looking for anything that wakes up our CPU too much, and if possible, we will disable it. In this case, it is mostly taken by OpenShift and hrtimer - this stands for High Resolution Timer that we can’t really disable, I would just recommend being on the latest Kernel. There were some really old bugs causing this one to go really high. Nothing else is running that we could shut down.
Use the tab key to browse, take a look at some interesting numbers. For example in you can see that our CPU is in the C6 state 85-90% of the time in Figure 2.
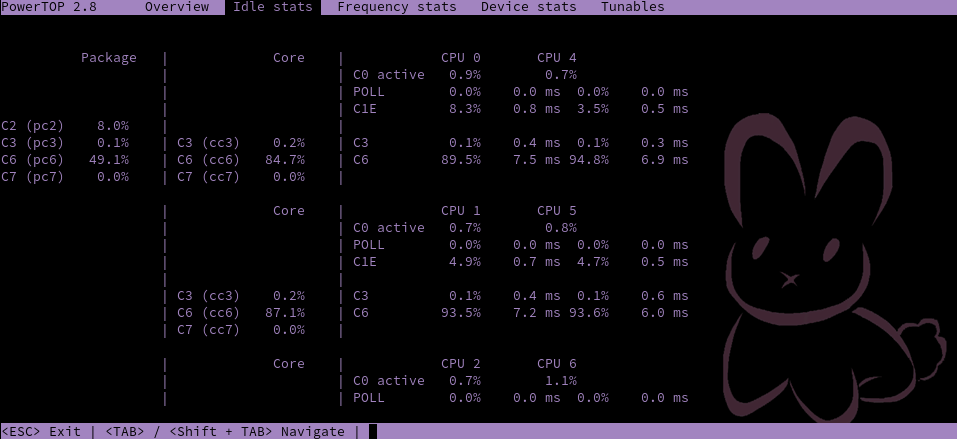
Figure 1: PowerTOP - CPU Idle stats
We are interested in the last tab Tuneables (Fig. 3)
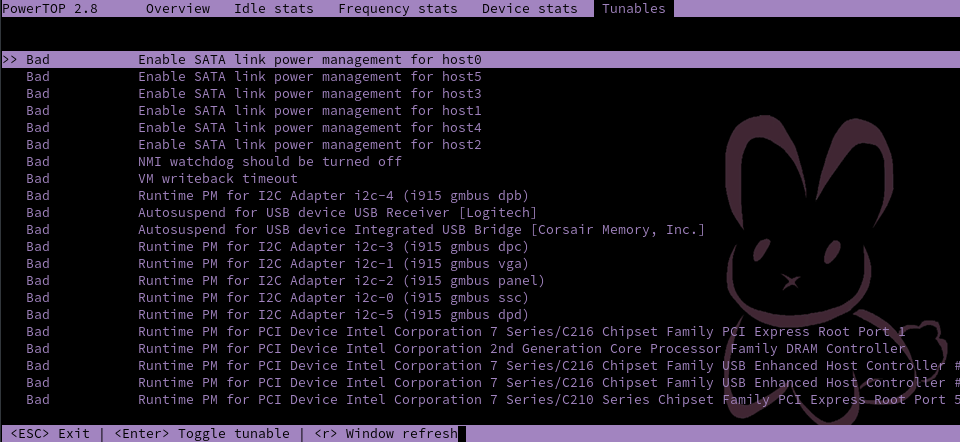
Figure 1: PowerTOP - Tuneables
As you can see there are some badly tuned components. This means, that they could eat less power! We can either cherrypick through the list, create a list of commands to disable specific stuff when the PC boots, or just have it tuned automatically. We will be using auto-tune as it is nice and simple, and in this case the list it displays seems like it could all be tuned well, no suspicious components.
Create a new systemd unit file if it does not exist:
vim /lib/systemd/system/powertop.service - The contents should be as follows:
[Unit]
Description=PowerTOP autotuner

[Service]
Type=oneshot
ExecStart=/usr/sbin/powertop --auto-tune

[Install]
WantedBy=multi-user.target
systemctl enable --now powertop - Now simply enable this service and run it.
Thanks!
I hope that this was useful post for someone, most of it will also apply to notebook users. If you are interested in very detailed guide to power management, I recommend reading the RHEL Power Management Guide 3
A little tip
Did you ever run vim without sudo while editing a service, such as the above? Then you write all the things and only when you’re done you will notice that you can’t save it. Add this to your ~/.vimrc file:
cmap w!! w !sudo tee >/dev/null % - And now you can nicely save it using our cute “write!!” :w!! command :]
Ref 1: Everything You Need to Know About the CPU C-States Power Saving Modes
Ref 2: What are CPU “C-states” and how to disable them if needed?
Ref 3: RHEL Power Management Guide